woensdag 19 december 2012

Prettige Feesten! - Happy Holidays!

Nu mijn pinguin-kerstkaartjes onderweg zijn naar hun bestemmelingen wil ik ze hier toch al even laten zien =)

I've sent my penguin -christmas cards today to friends and family. That penguin is so cute I just have to share him =)

Digi: Bugaboo Stamps - Penguin

Toen ik de brievenbus vanmorgen opende zat er een verrassing in! Een prachtige kerstkaart van Maria (http://marjasknutsel.blogspot.be/)
Danku, Maria!!!

When I opened the mailbox this morning I found a surprise inside! A beautiful christmas card from Maria! (http://marjasknutsel.blogspot.be/)
Thank you very much, Maria!!!


Groetjes / Greetings,

Eline

zondag 16 december 2012

Hier Toasten we op! - This calls for a Toast!

Vorig weekend werd mijn oudste neef, Kenneth, 30 jaar! Hier moest heel de familie op klinken =)

Last weekend my oldest cousin, Kenneth, turned 30! The whole family came together to celebrate =)


Een heel eenvoudig kaartje gemaakt met Kraft papier, Copics, stempels van Paper Smooches - Wake up en een stukje papier van Limetwist - Out of the Blue.

A very simple card made with Kraft, Copics, Paper Smooches - Wake up stamps and cardstock from Limetwist - Out of the Blue.

Groetjes / Greetings,

Eline

dinsdag 20 november 2012

Zeemeermin Miranda - Mermaid Miranda

Vandaag wil ik graag een onderwater -scene met jullie delen. Mermaid Miranda van Tiddly Inks gecombineerd met een achtergrond van Make it Crafty. Het is de eerste keer dat ik me waag aan het combineren van verschillende digi-stamps. Hiervoor heb ik het gratis programma Gimp gedownload van het internet. Het was wel even zoeken hoe het programma in elkaar zat maar na een klein beetje vloeken is het me dan toch gelukt =)

Op de blog van Make it Crafty vond ik een tutorial over "Zonlicht in het water". http://www.makeitcrafty.com/store-blog/techniques/underwater-shipwreck
Ik slaag er maar niet in om grote oppervlakken egaal in te kleuren met 1 Copic. Deze techniek met lijntjes leek me dus een leuke oplossing daarvoor. Het bleek zelfs iets makkelijker te zijn dan eerst gedacht.

De foto is een beetje flets door onvoldoende daglicht. Een probleem waar wel meer bloggers mee kampen in deze kille herfst- en wintermaanden =/

1 tip wil ik jullie alvast meegeven: met het kleuren van het water mag je lekker strepen trekken over alles heen, BEHALVE het gezicht =) Ik maakte 1 uitschuiver en kreeg het niet meer weggewerkt =(

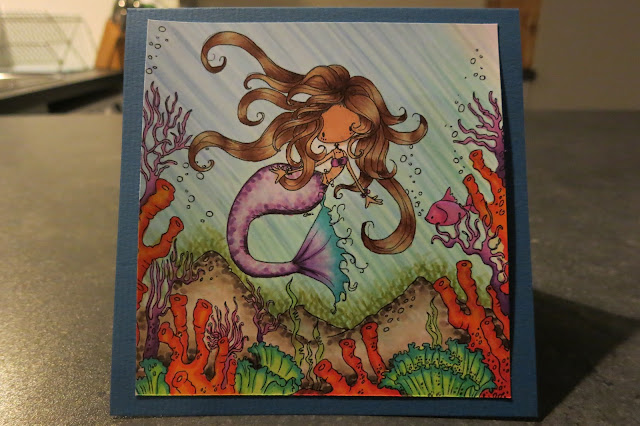
Digi's: Mermaid Miranda - Tiddly Inks / Coral Border - Make it Crafty

Today I'm happy to share with you an underwater scene showcasing Mermaid Miranda and a Make it Crafty background. It's the first time that I'm combining digi's together. To do this I downloaded the free program Gimp.

On the Make it Crafty blog I found a tutorial on how to create sunrays in the water and it just seemed so much fun! http://www.makeitcrafty.com/store-blog/techniques/underwater-shipwreck

The colors in the picture are not that bright because of a lack of daylight. A problem many Bloggers have to cope with nowadays =/

One advise I would still like to give you is: When you are coloring the water avoid the face! It's very difficult to blur the blue stripes with light skin colors =/ I had to learn the hard way unfortunately =(

Copics:
Water: B32, B00,B93, B63 for the whole picture, BG13, G00 added bottom right, YG95 and YG97 for seaweed
Zand / Sand: E40, E42, E43, E47, E49
Koraal / Coral: V05, V06, V09 - BG45, BG13, YG01 - Y38, YR07, R08
Haar / Hair: E21, E23, E25, E29
Huid / Skin: E11 (trying to cover the blue..)
Staart / Tail: V0000, BV00, BV02, V05, V06,V09

Groetjes / Greetings,

Eline

zondag 11 november 2012

Workshop @ Maria + Goed nieuws / Exciting news

Ik ben een geweldige sloddervos.. zo, dat is eruit.. 2 weekjes terug mocht ik gaan workshoppen bij Maria van Maria's Knutselplezier http://marjasknutsel.blogspot.be/ ik wilde het resultaat natuurlijk met jullie delen.. Helaas kon ik het geheugenkaartje van mijn camera niet meer vinden =/ Maar het is nu terecht! Dus nu kan ik eindelijk laten zien wat Maria mij zoal geleerd heeft =)

Mijn mama en ik hadden het echt naar onze zin zo lekker gezellig knutselend in de zonnige veranda. Op verzoek leerde Maria ons werken met Distress inkten =) Als eindresultaat gingen we naar huis met elk 2 kaarten:


2 weeks ago me and my mom were invited @ Maria from the blog Maria's Knutselplezier http://marjasknutsel.blogspot.be/ for a workshop about working with Distress ink. We spent a lovely afternoon and went each home with two stunning cards.

Een hele andere stijl dan ik gewoon ben dus ik moet nog veel oefenen, maar door de duidelijke step-by-step uitleg mag het resultaat er toch wezen!
Bedankt, Maria voor deze leuke namiddag!

It's a totally different style so there is still room for improvement. But with the clear step-by-step instructions of Maria the cards turned out more than okay.
Thank you, Maria for this fun experience!

Verder kreeg ik de laatste twee weken 3 maal goed nieuws:
Over the last two weeks I got 3 times exciting news:

1+2) Mijn halloween kaart behaalde Top 3 bij zowel de Dilly Beans Challenge-blog als de Digi Galore Challenge-blog! De badges staan nu lekker links op mijn blog te pronken *trots* =)
My halloween card got picked Top 3 both at the Dilly Beans Challenge-blog and the Digi Galore challenge-blog! The badges are now blinking on the left sidebar of my blog *proud* =)

3) Liesbeth van de blogs "Making cards by Liestbeth" en "CreatieveDame" beloonde mijn blog met de Liebster Blog - Award! Een echt duwtje in de rug om terug meer te creeren! Bedankt, Liesbeth!
Liesbeth from "Making cards by Liesbeth' and "CreatieveDame" rewarded my blog with the Liebster Blog -Award! This really pushes me to start creating more! Thank you so much, Liesbeth!
Bezoek zeker eens haar blogs! Make sure to visit her blogs!
http://cardsbyliesbeth.blogspot.be/ http://creatievedame.blogspot.be/


Aan het ontvangen van deze Award hangen een paar regeltjes vast. Zo mag ik 5 andere blogs die minder dan 200 volgers tellen belonen met deze prijs =D Ik ga de komende weken dus Blogland afschuimen op zoek naar speciale blogs die wat extra aandacht verdienen =)

This Award comes with a few rules.One of them giving me the task to give this Prize to 5 blogs with less than 200 followers =D The next few weeks I will be travelling through Blogland looking for 5 special blogs to reward =)

Groetjes / Greetings,

Eline

dinsdag 23 oktober 2012

Happy Halloween!

Laatste zondag eens lekker de tijd genomen om "Ragdoll Ruby" van Dilly Beans Stamps in te kleuren. Ideaal voor een schattige halloween kaart!

Last sunday I found finally the time for some colouring! I chose "Ragdoll Ruby" from Dilly Beans Stamps. She's perfect for a cute halloween card!

Ik test momenteel de Blogger App voor Iphone dus even spannend of deze post wel goed komt =)

I'm currently testing the Blogger App for Iphone so I hope this post turns out OK=)

Copics:
Haar/ Hair: YR21, YR14, YR07, R08
Huid/ Skin: W1, W3, W5; C1, C3, C5
Kledij/ Clothes: YG93, YG95, YG97, YG99; R83, R85

Ander Materiaal / Extra Material:
Kraft
Washi tape (Hema)
Witte Gelpen / White Gelpen
Dymo

Het plastiek griezelspinnetje zat bij een supermooie Halloween tag die ik won bij "Maria's Knutselplezier" =) Ik zal de tag een volgende keer eens tonen. Bedankt, Maria!

The creepy crawly plastic spider was included with the Halloween Tag I won at "Maria's Knutselplezier" =) I will show the tag in a next post. Thx, Maria!

Ik zie net dat op de Dilly Beans Challenge blog het thema "Cute & Creepy" is, wat een meevaller!
Dan ding ik graag mee naar een prijsje =)
Ook bij de blog "Digi Galore" waag ik graag mijn kans. Aangezien ik meestal met digi's werk ben ik heel blij dat ik deze challenge blog ontdekt heb!

I just notice that on the Dilly Beans Challenge blog the Theme of the week is "Cute & Creepy", how about that! Let's see if I get lucky this time =)
I'm also participating at the "Digi Galore' blog. All their challenges are bout using Digi's! So glad I found this blog!

Groetjes/ greetings,

Eline

dinsdag 25 september 2012

The Paper Players Challenge #114 - You are so beautiful

Ik kwam op het wereldwijde web de "The Paper Players Challenge Blog" tegen. Deze week dagen ze je uit een kaart te maken met de volgende Sketch:

On the world wide web I came across "The Paper Players Challenge Blog". This week they challenge you to make a card following this Sketch:


Eerst wou ik een verjaardagskaart maken met een Cupcake maar die stond helaas al tussen de voorbeelden =/  Dus besloot ik het over een andere boeg te gooien:

At first I wanted to make a birthday card with a big Cupcake but scrolling down the post a design team member used the same idea already. (great minds think alike ;-D) So I decided to try something different:


Stamp: Gorjuss - Sitting

Het is mijn eerste deelname aan een sketch challenge. Ik weet niet hoe streng de regels worden toegepast dus ik volgde dan maar gewoon het strakke design. Ik hoop alleen dat ze mij vergeven dat het een vierkante en geen rechthoekinge kaart is. Ik had alleen maar vierkante kaartjes in huis =/

It's my 1st time participating with a Sketch challenge. I don't know exaclty how strictly the sketch needs to be followed so I decided to keep it kinda basic. I hope they forgive me for the card being square. It's the only shape I have for the moment.

En? Geslaagde eerste deelname?
And? Is it okay for a 1st time Sketch challenge - participation?

Groetjes / Greetings,

Eline


zondag 23 september 2012

Shana Tova + Stickles Star Dust Try-out

Goedemorgen!
Vorig weekend werd Joods Nieuwjaar gevierd. Ter ere maakte ik volgend kaartje. Het jongetje is de Digi "Ari with Shofar" van Mo's Digital Pencil. Een Shofar is een Ramshoorn. Op beide dagen van Rosh Hashana wordt 100 maal op de Shofar geblazen om zo het nieuwe jaar in te luiden.

Goodmorning!
Last weekend the Jewish Community was celebrating New Year. I made the following card using the Digi "Ari with Shofar" from Mo's Digital Pencil. A Shofar is a Ram's horn. On Rosh Hashana it's tradition to sound the Shofar 100 times to announce the beginning of the New Year.


Digi: Ari with Shofar - Mo's Digital Pencil
Papier / Paper:
Lime Twist - Out of the Blue

Copics:
Huid / Skin: E000, E00, E21, E11
Haar / Hair: E55, E57, E59
Kledij / Clothes: E32, E34, E37 - YR23, E33, E35, E37, E39 - W1, W3 - C1, C3, C5,C7,C9
Shofar: YR30, Y21, YR31, YR23

Ik was vandaag veel te vroeg wakker voor een zondagochtend en besloot dan maar eens aan de Kerstkaarten te beginnen =) Zo kon ik eindelijk eens de Stickles uitproberen die ik kreeg van Mrs Pickle: http://mrspicklestamps.blogspot.be/.
Ik ben gestart met een eenvoudige winterdigi van Bugaboo Stamps: "Penguin" en heb zijn mutsje en de sneeuw bedekt met Star Dust - Stickles. De glitterlijm bleek heel makkelijk en nauwkeurig aan te brengen; ik ben fan! Maar kan iemand mij vertellen hoe lang Stickles moet drogen =)?


Digi: Penguin - Bugaboo Stamps

Today I woke up too early for a Sunday morning. I decided to start preparing Christmass cards. Finally I found the time to try out my new Star Dust Stickles which I got from the amazing Mrs Pickle: http://mrspicklestamps.blogspot.be/.
I took a supercute winterdigi from Bugaboo Stamps called "Penguin" and I coverd part of his hat and the snow with Stickles. The glitter glue was very easy to apply, I'm a fan! But can somebody tell me how long it takes to dry =)?

Creatieve Zondag gewenst allemaal!
Wishing you a creative Sunday!

Eline

dinsdag 18 september 2012

Copic Color Combo - Aziatische Huid / Asian Skin

Zalig zo een lekker lang weekend! Vandaag voor de eerste maal eens het Aziatische huidtype bestudeert. We moeten dus de gele toer op zonder het karikaturaal te doen lijken.. Hieronder 2 probeersels waarbij ik de Aziatische versie van de Digi van Mo Manning gebruik =)

I'm currently enjoying a 4-day weekend! I could get used to this! Today I tried to color for the first time Asian skin tones. Below 2 experiments using the Eastern Version of the Digi of Mo Manning:


Digi: Easter Kiko - Mo's Digital Pencil

Ik koos foor de E50-familie aangezien deze net iets geliger is dan de kleuren die ik normaal gebruik. Ook als blush koos ik niet voor R maar voor YR. Helaas was het eindresultaat niet zo heel chinees. Zonder in stereotiepen te hervallen wou ik alles toch nog net wat geler. Ik besloot om bij mijn 2de poging Y00 bij te mengen. De volledige werkwijze volt hieronder:

I started of using the E50-s Copic Family as they are slightly yellow toned. Also as blush I choose YR instead of just R. The endresult though is still quite Caucasion. Thus I decided to make a 2nd attempt en to throw Y00 to the mix =) :

1ste Poging
E50 als basis. Vervolgens legde ik mijn schaduwen met E53 en E55. Gebruik niet te veel E55, gewoon een dunne schaduwrand. Daarna nam ik E51 en ging ik met kleine cirkelvormige bewegingen over de schaduwen heen tot in E50. Laat voldoende open ruimte voor de highlight. Ga over alles weer heen met E50. Ik bracht als final touch blush aan met YR00.

2de Poging
Net dezelfde werkwijze behalve dat je net voor het aanbrengen van de blush je met Y00 over alles heen gaat met brede rechte stroken van links naar rechts. Geen cirkeltjes draaien want dan verdwijnt al het schaduwwerk.

1ste Attempt
E50 as a base color. Next I put the shadows with E53and E55. don't use too much of E55, just a thin line around the face is sufficient. Then I took E51 and went with small circular movements over all the shadows that I just layed down and into E50. Make sure to leave enough space for the highlight. Last I used E50 on the whole face with big wide strokes. As a final touch I made her blush with YR00.

2nd Attempt
Do exactly the same as described on top except right before you add the blush you first take Y00 and go over the whole face with big wide strokes. Don't make circular movements as it will ruin the shadows.

Groetjes / Greetings,

Eline


zondag 16 september 2012

Copic Color Combo - Lichte Huid / White skin

Prettige Zondag gewenst! Vandaag een Copic kleurcombinatie voor lichte huid. Deze keer dus met de Europese versie van de Digi van Mo's Digital pencil:

Nice Sunday to everybody. Today I'm sharing a light skin color. For this I used the Caucasion version of Mo Manning's Digi:

Digi: Easter Carly - Mo's Digital Pencil
E000 als basis. Vervolgens legde ik mijn schaduwen met E21 en E11. Daarna nam ik E00 en ging ik met kleine cirkelvormige bewegingen over de schaduwen heen tot in E000. Laat voldoende open ruimte voor de highlight. Ga over alles weer heen met E000. Ik bracht als final touch nog een beetje blush aan met E93.

E000 as a base color. Next I put the shadows with E21 and E11. Then I took E00 and went over all the shadows that I just layed down with small circular movements and inside the area colored with E000. Make sure to leave enough space for the highlight. Last I used E000 on the whole face with big wide strokes. As a final touch I made her blush with E93.


Groetjes / Greetings,

Eline

zaterdag 15 september 2012

Copic Color Combo - Donkere Huid / Dark Skin

Heyhey! Na verscheidene haarkleurtjes eens iets anders: Huidskleuren! Niet gemakkelijk aangezien huid absoluut niet streperig of vlekkerig mag zijn.. Daarvoor voelde ik me veel gelimiteerder bij het kiezen van kleuren.  Ik heb na enige tijd experimenteren toch een fijne combinatie gevonden:

Digi: Easter Lahra - Mo's Digital Pencil
Hello! After sharing a few haircolor combo's, today for a change: skincolors! Turned out to be quite a challenge as finding good combinations for skin seems to me much more limited. all colors need to blend well without streaking or blotching.. Took me some time but in the end I came up with the following Copic Color combo for darker skin complexion:

E21 als basis. Vervolgens legde ik mijn schaduwen met E13 E23 en E25. Daarna nam ik E11 en ging ik met kleine cirkelvormige bewegingen over de schaduwen heen tot in E21. Laat voldoende open ruimte voor de highlight. Ga over alles weer heen met E21. Ik bracht als final touch nog een beetje blush aan met E32.

E21 as a base color. Next I put the shadows with E13 E23 and E25. Then I took E11 and went over all the shadows that I just layed down with small circular movements and inside the area colored with E21. Make sure to leave enough space for the highlight. Last I used E21 on the whole face with big wide strokes. As a final touch I made her blush with E32.

Mooi prentje he? Het is een digi van Mo's Digital Pencil. Echt een fantastische artieste die begon met rubber stempels en nu reeds een tijdje ook het digitaal avontuur aanging. Het leuke is dat zij vaak eenzelfde design  in verscheidene versies maakt. Zo heb je dit Afrikaans schatje ook in een Europese en Aziatische variant. Ideaal voor mijn Copic color Sample boek dus =D Je kan en mag Mo Manning ook altijd suggesties e-mailen. Zij antwoordt supersnel en na enkele dagen vond ik mijn aangevraagde digi al in de online store. Geweldig! http://www.mosdigitalpencil.com/

Beautiful digi, isn't it? It's an image from Mo's Digital Pencil. She's really an amazing artist who started of making rubber stamps but soon went digital too. The fun thing about many of her designs is that she makes them in multiple nationalities. The African cutie from the picture is also available as Caucasian and Asian digi. Perfect for my Copic color Sample Book. It's possible to contact Mo Manning for any requests. She's answering extremely fast and in my case after only a few days I could find the requested digi in the online webstore. Amazing! http://www.mosdigitalpencil.com/

Groetjes / Greetings,

Eline

vrijdag 14 september 2012

Danku Mevr. Pickle! - Thank You Mrs. Pickle!

 
Een tijdje geleden vierde Cathy van de blog "Mrs. Pickle Stamps" het een-jarig bestaan van haar blog. Om ons in de vreugde te doen delen verlootte zij een Candy en.. IK WON =D Op die foto zie je wat ik in de brievenbus vond (wel eigelijk op het postkantoor, moest het pakketje gaan ophalen): Lekker veel stempels (The Greeting Farm, Some odd Girl, Sentiments, 2 superschattige Mini Mermaids,..), een Papier pad van Basic Grey en pastelkleurig hobbypapier, 2 flesjes stickles (wilde ik altijd al eens proberen! vrees dat dit het begin is van een nieuwe verzamelwoede), een inktpad en een superlief handgemaakt kaartje om mij Proficiat te wensen =D Thx Cathy! Bezoek zeker eens haar blog: http://mrspicklestamps.blogspot.be/ Ik hoop om snel enkele goodies uit te kunnen proberen!
 
A short while ago Cathy from the blog "Mrs. Pickle Stamps" was celebrating her one year -blog existance. To let her followers share in the joy she gave away a gorgeous Candy and.. I WON =D As you can see on the pic that I received: Many many stamps (The Greeting Farm, Some odd Girl, sentiments, 2 super cute Mini Mermaids,..) , a Basic Grey paper pad and pastel colored papers, 2 bottles of Stickles (always wanted to try those!), an ink pad and a super sweet hand made card to wish me Congratulations =D Cathy Rocks! Make sure to check out her blog: http://mrspicklestamps.blogspot.be/
Hope to be using few of these goodies soon!
 
Zo, nu moest ik toch even met dit alles stoefen =) Fijn weekend allemaal!
 
Yeah, just had to brag a little bit with all this gorgeous stuff =) Lovely weekend to everybody!
 
Eline

zondag 9 september 2012

Card - You make me see Stars

Fijne zondag gewenst allemaal!
Nog een kaartje in de reeks. Dit maal "You make me see Stars".
Ik moet er nu lekker vandoor om een ontspannende zomerse fietstocht te gaan maken =) Heerlijk!

Hope all of you are enjoying a happy/lazy/sunny sunday!
Another card with Shy Mae, "You make me see Stars". Hope you'll like it.
Now I'm going out to make a lovely relaxing bicycle tour =) Love it!


Digi: Shy Mae - Some odd Girl
COPICS
Haar / Hair: "Honey Blonde"
Kledij / Clothes: R20 R22 R35 R27 R29, B93 B95 B97
Huid / Skin: YR0000 YR00 YR01

PAPIER
Echo Park - This & That
Lime Twist - Out of the Blue


dinsdag 4 september 2012

Card - You give me Butterflies

Heyhey!
Snel nog eens een kaartje gemaakt naar het voorbeeld van de vorige post "You blow me Away".
Deze keer "You give me Butterflies" als thema.. aahhh de romantiek =)

Hello!
I used the layout of the card "You blow me away" a 2nd time and created a new card titled "You give me Butterflies". Feeling kinda romantic lately, haha =)


Digi: Shy Mae - Some odd Girl

COPICS
Haar / Hair: "Golden brunette"
Huid / Skin: YR0000 YR00 YR01
Kleding / Clothes: RV63 V05 RV66 RV69, BG13 BG72 BG75 BG78

PAPIER / PAPER
Limetwist - Happy go Lucky
Echo Park - This & That


maandag 27 augustus 2012

Card - You Blow Me Away + Copic Color Combo - Fel oranje Haar / Bright orange Hair

Een tijdje geleden kocht ik een heel mooi papierblokje van Echo Park Paper Co, "This & That" genaamd. Het bevat designpapiertjes met leuke retrokleurtjes. Op het blog van The odd Girl ( http://www.theoddgirl.com/ ) kwam ik het papiertje met de ventilators tegen met 'You blow me away" als bijschrift.. vond ik zo geweldig dat ik zelf ook zo'n kaartje wou maken =) En zie hier het resultaat:

Digi: Shy Mae - Some odd Girl
A while ago I bought a Paper pad from Echo Park Paper Co, called "This &That". It's full of cute designpapers in retro-colors. On The odd Girl-blog ( http://www.theoddgirl.com/ ) I saw Kristy using the paper with all the ventilators with "You blow me away" as title. I thought the card to be so cute I tried to make one myself =) And... on top you see the result!

Fel oranje Haar / Bright orange Hair

YR21 - YR14 - YR07 -R08

Deze haarkleur is 1 van mijn favorieten. Er zijn slechts 4 Copics voor nodig en het effect is gewoon WAAUUWW! Zoals steeds kleuren van licht naar donker en van donker naar licht =)

This bright orange hair color is absolutely my favourite! You only need 4 Copics and the result is GORGEOUS! As always you need to feather from light to dark and from dark to light =)

Ik vind het super dat jullie zo lovend zijn over mijn haarkleurtjes! Ik hoop dat jullie ondertussen al enkele hebben uitgeprobeerd! Vergeten jullie niet een beetje mond-aan-mond reclame te maken zodat ik nog enkele volgers bijkrijg? =) Zou echt geweldig zijn! Bedankt!

I really appreciate all the lovely comments I receive about my Hair color Combo's. I hope you all found the time to try out a few. May I ask you, if you like my blog, to spread the word so I can get few more followers! This would be awesome! Thx!

Groetjes / Greetings,

Eline

zaterdag 25 augustus 2012

Copic Color Combo - Fel Rood Haar / Bright Red Hair

Hey allemaal!
Een regenachtige ochtend was net wat ik nodig had om zonder schuldgevoelens nog eens lekker binnen aan het kleuren te slaan =D Vandaag ook weer een rode haarkleur.. de combinaties voor rood haar zijn gewoon eeiiiiindeloooos =) (wou dat ik over blond of zwart haar hetzelfde gevoel had) Ik zie wel dat ik een foutje heb gemaakt. Ipv E08 gebruikte ik E09. Maar aangezien beide kleuren zo gelijkaardig zijn is het verschil minimaal. Je dan dus lekker kiezen welke je gebruikt, of je gebruikt ze gewoon allebei =) Veel kleurplezier!

Digi: Shy Kaylee - Some odd Girl
Tussen laag R27 en R29 highlight je met YR09
Between layer R27 and R29 you highlight with YR09
Helly everybody,
A rainy morning gave me the opportunity to stay indoors and take out my Copics without a guilty conscious =D Today again a red hair color combo. I just feel that for red hair the options are endless (wish I could say the same about blonde or black hair =/) I see I wrote a little mistake. I actually used E09, not E08. But as both colors are that similar I guess you can choose which one you will use.. or you could just use them both and add even more depth! It's up to you! Happy coloring!

Groetjes / Greetings,

Eline

dinsdag 21 augustus 2012

Copic Color Combo - Donker Auburn / Dark Auburn

Wat een geweldig weer seg! Ik was zo triest om terug te moeten komen van vakantie, maar ik belande hier direct opnieuw in de vakantiesfeer =D Heb na de werkuren er dan nog maar even volop van genoten: een recordaantal bbq's met vrienden en familie =D Maar nu moeten we dus even terug in de routine komen, he!
Vandaag een Copic color combo voor donker Auburn haar.


E09 - E49: licht tot donker en donker tot licht, 100: donkere accenten
E09 - E49: light to dark and dark to light, 100: dark accents
Digi: Shy kaylee - Some odd Girl
What a beautiful weather we are having here in Belgium! A tropical heatwave made me decide to prolong my holiday a little bit more =D I spent the last week hopping from bbq to bbq, amazing! But now it's high time to share again a copic color combo with you: dark Auburn hair.

Hoop dat jullie ook nog de vakantiesfeer te pakken hebben!
Hope all of you are also having a good time!

Groetjes / Greetings,

Eline

zondag 22 juli 2012

Copic Color Combo - Bruin Haar / Brown Hair

Eindelijk nog eens weekend met zomerweer =) (we mogen niet meer te kieskeurig zijn, he). Toch nog even snel in de Copics gedoken zodat ik vandaag nog een kleurcombinatie voor donker bruin haar kan laten zien. Misschien herinneren jullie zich ook nog de kaart die ik maakt voor de Paarse challenge op het Dilly Beans challenge blog? Ik kleurde daarvoor mooie lichtpaarse lange haren maar vergat de kleurcombinatie neer te schrijven. Na eventjes zoeken heb ik de combo toch teruggevonden dus deze krijgen julllie er ook nog bij =)

Today I'm sharing with you a Copic colorcombination for dark brown hair.
Maybe you still remember the card I made for the Purple challenge on the Dilly Beans challenge blog? I colored an image with purple hair but forgot to write down the color combo. After playing around with my Copics a little bit I found it again so also this I will share with you =)

Donker bruin haar / Dark brown Hair
Digi: Shy Kaylee - Some Odd Girl
Voor de donker bruine haren werkte ik deze keer enkel van donker naar licht, zonder eerst een basiskleur te voorzien. Anders gingen de kleuren bij mij een beetje vlekken.

For the dark brown hair I only worked from dark to light this time, and without putting first a base color. Otherwise the colors would start to smear.

Lichtpaars Haar / Violet Hair
Digi: Shy Kaylee - Some Odd Girl
Voor het paarse haar heb ik zoals steeds gewerkt van licht naar donker en van donker naar licht. RV91 als basis en vervolgens laagje per laagje opbouwen.

For this Violet hair I used my normal working method: RV91 as a base. Then from light to dark and from dark to light.

Groetjes / Greetings,

Eline

maandag 16 juli 2012

Copic Color Combo - Zwart haar / Black Hair

We starten de week met een Copic kleurcombinatie voor zwart haar. Om diepte in je afbeelding te behouden is het belangrijk niet te veel met Copic 100 / 101 te werken. Pekzwart neemt immers alle kleurschakeringen weg. We moeten dus aan de slag met de grijstinten.
In mijn hele Copic collectie heb ik slechts 10 grijstinten. Veel varieren is dus best wel moeilijk. Daarom probeer ik steeds een extra kleur aan de grijstinten toe te voegen.

Let's start the week with a Copic color combination for Black hair. To keep dept in your images it's important not to use too much Copic 100 / 101. Pitchblack will take out all play of colors. It's better to use the grey tones. In my entire Copic collection I only have 10 grey tones. To be able to make a variaty of black hair color combo's I experiment with mixing greys with other colors.

Zwart haar met blauwgrijze schijn - Black hair with blue-grey shine


Digi: Shy Kaylee - Some Odd Girl

Om het eentonige grijs een beetje te doorbreken koos ik om B60 en B63 toe te voegen. Gebruik B60 als basis. Vervolgens C3, B63, C5, C7 en C9. Zoals steeds van licht naar donker en dan weer van donker naar licht. Toch geeft het toevoegen van deze twee blauwe kleuren nog steeds redelijk basic zwart haar. Voor volgende keer zoek ik een Color combo die een tikkeltje verder gaat.

To break the dull grey color sequence I added B60 and B63. Start with B60 as base color. Then feather with C3, B63, C5, C7 and C9. As always you start from light to dark and then from dark to light. Adding these two colors is not resulting in a dramatic change of the black hair color. It adds just a little extra shine. For next time I will look for a Black color combo with more effect.

Groetjes / Greetings,

Eline

zaterdag 14 juli 2012

Copic Color Combo - Bruin haar / Brown Hair

Hey allemaal! Fijn weekend gewenst! Vandaag nog snel een Copic kleurcombinatie voor bruin haar. Ik hoop dat jullie merken dat ik de voor de hand liggende Color combo's (zoals E23 E25 E27 E29) probeer achterwege te laten. Hoop dat ik zo een beetje verrassend uit de hoek kan komen ;-) Dit wil niet zeggen dat je met opeenvolgende kleurnummers geen mooie effecten kan krijgen, natuurlijk. Integendeel!

Hello, everybody! Wishing you a fun and relaxing weekend! Today quickly a Copic color combination for brown hair. You might have noticed I try to avoid the more "obvious" Color combo's (like E23 E25 E27 E29). Doing this I hope to be able to surprise you ;-) This doesn't mean that using successive numbers of the same color family gives you lesser results, of course.

Gouden Brunette / Golden Brunette

Digi: Shy Kaylee - Some Odd Girl
Y26 als basis. Vervolgens E35, E37 en eindigen met E27. Van licht naar donker en van donker naar licht. Wanneer je met E37 over E27 gaat verlies je de echte donkerste schaduwen dus best deze op het einde terug even aanstippen met E27. Vandaar mijn suggestie om misschien de iets donkerdere E29 te gebruiken als deze in je collectie zit.

Y26 as base color. Feather with E35, E37 and E27. Work from light to dark and after from dark to light. E37 tends to lighten E27 too much so I prefer at the end to accentuate the darkest parts again with E27. Therefore I suggest to use the darker E29 if you have this color in your Copic collection.

Groetjes / Grtz,

Eline

donderdag 12 juli 2012

Copic Color Combo - Blond Haar / Blonde Hair

Zoals beloofd een 2de Copic kleurcombinatie. Ik ga proberen 3 maal per week een nieuwe combo te posten. Aangezien ik momenteel vooral haarkleuren verzamel zullen deze voornamelijk eerst aan de beurt komen. Deze keer ga ik voor blond haar. Naar mijn mening de moeilijkste haarkleur met Copics. Vaak wordt het geheel te geel/ te bruin/ te rood/... best frustrerend ;-)

As promised my 2nd Copic color combination. I will try to post new combo's 3 times a week. As I'm currently obsessed with coloring hair you will find more and more of them over the weeks on my blog. This time a color combo for blonde hair. In my opinion blonde is the most difficult haircolor. It either turns out too yellow/ too brown/ too red/... kinda frustrating ;-)

Honing blond - Honey Blonde


Digi: Shy Kaylee - Some Odd Girl
YR30 als basis. Vervolgens YR31, YR23 en YR27. Daarna opnieuw van donker naar licht indien nodig. Op het einde gebruik je op de donkerste stukken Y38 en op de lichtste stukken Y11. Zo krijgt het blond een hele mooie honing glans. Niet te veel meer mengen met Y38 en Y11! Gewoon even zachtjes over het geheel heengaan. Anders vervagen alle mooie overgangen die je eerst gecreëerd hebt. Indien je YR30 niet in je collectie hebt kan je deze kleur ook weglaten. Dan dien je wel het deel waar de gele highlight moet komen open te laten.

Use YR30 as a base color. Next feather with YR31, YR23 and YR27. Light to dark and after dark to light if necessary. At the end you use Y38 to highlight the darkest parts and Y11 to highlight the lightest parts. Like this the blonde hair gets a beautiful honey shine. Don't blend too much with Y38 and Y11! Just a few gently strokes as otherwise the beautiful feathering of the colors below will disappear. If you don't have YR30 in your Copic collection you can leave out this color. Just leave the place where the yellow highlight  needs to come blank then when you are feathering.

Ziezo! Veel probeer-plezier!

Enjoy!

Groetjes / Greetings,

Eline

maandag 9 juli 2012

Copic Color Combo - Rood Haar / Red Hair

Hey allemaal.. terug van lange tijd weggeweest =/ Het is zo druk op het werk dat ik maar niet aan scrappen toekom. Dit betekent echter niet dat mijn Copics in een hoekje stoffig worden. Bijna dagelijks vind ik wel een nieuwe kleurcombinatie die ik eens wil proberen. Nu ik deze allemaal netjes in mijn Copic Sample book bijhoud is het veel makkelijker om deze kleurcombinaties te delen.
Ik denk dat ik dan ook in de toekomst ipv enkel volledige projectjes te posten ook kleurcombinaties zal tonen. Ik hoop dat jullie dit leuk vinden =)

Hello everybody.. I'm finally back! Lately it's so busy in the office that I get home exhausted with no time or energy to scrap. But this doesn't mean my Copics are left unused in a dusty corner. I love to try out new color combinations and do this almost daily. So I decided instead of only sharing completed projects I will also start sharing my Color combo's. Hope you like that!

Zalmrood Haar - Salmon Red Hair


Digi: Shy Kaylee - Some odd Girl
E11 als basis. Vervolgens E95, YR14 en E08. Werk van licht naar donker en dan weer van donker naar licht.

Use E11 as a base. Then featherstrokes with E95, YR14 and E08. Work from light to dark and then from dark to light.

Ziezo =) Done!

Groetjes / Grtz,

Eline

vrijdag 22 juni 2012

Dilly Beans Stamps - Heart Monster

Morgen is een neef van mij jarig. We organiseren samen (ik verjaarde 15 juni) een verjaardagsfeest voor de hele familie =)
Kaartjes maken voor mannen.. het blijft toch net iets moeilijker =/ Ik vond dit Heart Monster van Dilly Beans Stamps toch echt wel een stoere vertederende knul en maakte volgend verjaardagskaartje :


Kraft - Dymo - Dress it up Tiny Stars - Copics - Derwent
 Tomorrow a cousin of mine is having his birthday. We are organizing together ( I turned 24 on 15/6) a birthday party for the whole family.
Making cards for men is slightly more difficult =/ I thought this Heart Monster of Dilly Beans stamps might just do the trick.

Ik kleurde de digi met Copics. Vervolgens wilde ik met wit Derwent potlood een lichte schaduw aanbrengen op de Kraft. Dit liep echter totaal fout: zonder terpentine kon ik de kleur niet vervagen en met terpentine verkleurde de kraft =$ Ik heb dan maar over de verkleurde delen heen gekleurd om de kaart te redden. (Ik heb wel vaker dit soort situaties voor aangezien ik meestal niet met een voorbedacht plan aan de slag ga =| )

I colored the digi with Copics. Next I wanted to create a light white glow on the kraft with Derwent pencil. However, without terpentine the white colour wouldn't soften and with terpentine my kraft paper turned dark =/ To save the card I coloured over all the ruined aereas. It turned out quite okay still.


Copics:
Huid / Skin: E53 E55 E57
Ogen / Eyes: Y21
Kledij / Clothes: Y23 Y26 Y28; BG72 BG75 BG78; R59 R46 R29 R27

Toch wel erg schattig, niet?
Cute, isn't it?

Groetjes / Greetings,

Eline

zondag 17 juni 2012

Copic voorbeeldboek - Copic Sample Smashbook

Ik heb eindelijk de perfecte "schrift" gevonden om al mijn Copic kleurcombinaties in bij te houden.
Een van de fijnste dingen om te kleuren met Copics zijn de haren. Ik heb dan ook besloten om eerst voorbeeldjes te maken van verschillende haarcombo's, beginnend met Rood haar.
De eerste pagina is zo na een dagje kleuren al lekker gevuld.


Digi = Shy Kaylee - Some Odd Girl

I finaly found the perfect notebook to keep all my Copic Color Combinations. One of the things I like to color most with Copics is Hair. So I decided to make samples of different haircolors, starting with Red hair. After one day with a little coloring the first page is finished.

De "shrift" is een Smashbook van K&Company. Elke pagina heeft een andere opdruk. Allemaal om ter mooist. Ideaal dus als basis voor een kleurrijk voorbeeldboek.


The notebook is a Smashbook from K&Company. Each page inside has a different design making it the perfect base for a colourful sample book.


Groetjes / Greetings,

Eline

zaterdag 16 juni 2012

Vriendin in de Kijker - Friend Focus

Vandaag wil ik jullie graag een kaart tonen die Maria me voor mijn 24ste verjaardag (15 juni) heeft toegezonden. Ik leerde Maria kennen omdat we beiden in dezelfde sector werkzaam zijn. Al snel bleek dat we dezelfde passie delen: Kaartjes maken. Maria heeft nu al enige tijd een blog en toen ik die voor de eerste maal bezochte viel mijn mond open van verbazing! Wat zij maakt zijn geen gewone kaartjes meer maar echte kunstwerkjes! Ik ga de foto's voor zich laten spreken =) Iedereen die na het zien van deze verjaardagskaart nieuwsgierig is naar meer kan haar blog bezoeken op http://marjasknutsel.blogspot.be/ (Ik heb ook een link bij mijn Favourites geplaatst). Bedankt, Maria! Ik ben superblij met deze prachtige kaart =D


Today I'm sharing with you a card that I received from Maria for my 24th birthday (15 june). We met as we are both working in the same branch and noticed we share the same hobby: Making cards.
When I visited Maria's blog for the first time I was stunned! She is not just making cards but creating pieces of art. I think the pictures speak for themselves. If you got curious for more you can visit her blog on http://marjasknutsel.blogspot.be/ (I also added a link in my Favourites). Thank you so much, Maria! I'm so happy with this beautiful Birthday-card!


Maar liefst 3 kaarten in 1!  Mooi, he?
3 cards in 1! Beautiful, isn't it?

Groetjes / Greetings,

Eline

zondag 10 juni 2012

Dilly Beans Challenge - PURPLE

Ik kocht enkele dagen geleden maar liefst 20 digi's van Dilly Beans Stamps. Designer Megan K. Suarez hield immers een fantastische promotie: 10 digi's kopen = 10 digi's naar keuze gratis! Ik wilde al langer enkele van haar ontwerpen maar kon nooit kiezen welke aangezien ze heel verschillende collecties heeft.. van cute en girly tot lekker donker en griezelig =) Door Megan's geweldige stuntverkoop werd het kiezen van digi's opeens veel minder hartverscheurend =D

Ik bezocht vanmorgend de Dilly Beans Challenge blog en zag dat de huidige challenge -PAARS- is. Ik heb vandaag dan maar de grote stap gemaakt en een kaart gemaakt voor mijn eerste deelname ooit aan een designchallenge =D De digi "Girl with Butterflies" met Paars haar! Duimen maar! (verder naar onder vind je de gebruikte materialen)


A few days ago I bought 20 digi's of Dilly Beans Stamps. Designer Megan K. Suarez was having an amazing Sale: Buy 10 digi's = Get 10 digi's of your choice for free! I wanted to get Dilly Beans Stamps for ages but just couldn't choose which ones to buy as Megan's designs are so divergent: from cute and girly to dark and kinda creepy. Because of Megan's Supersale choosing my Dille Beans Stamps got a lot less heartbreaking =D

This morning I visited the Dilly Beans Challenge blog and saw that the current challenge is -PURPLE-. This is the first time I'm participating in a challenge so Fingers Crossed!


Ik kleurde de digi met copics en gebruikte verder volgende materialen:

I coloured the image with Copics. Below a picture of other used materials.


Groetjes / Greetings,

Eline

vrijdag 8 juni 2012

Reis Agenda - Travel Notebook

Even lekker creatief ontspannen op vrijdag avond =) Ik wil al een tijdje mijn nieuwe Paper Smooches stamps en Washi tape uitproberen en besloot een reisdagboekje te maken. De basis is een klein Moleskine schriftje. Zij zijn verkrijgbaar per set van 3 voor 6.50euro.

Friday evening: time to clear the head after a busy week! I was very eager to try out my latest Paper Smooches stamps and Washi tape and decided to make a small travel notebook to use on my August holiday.
The base is a small Moleskine notebook. It's available in sets of 3 for a fairly low price considering it's a Moleskine ;-)


Alle stempels komen uit de Get Outta Town-set van Paper Smooches . Alles is gestempeld met Memento Tuxedo Black en ingekleurd met Copics + enkele accenten met Derwent Coloursoft potloden.

All stamps are from the Get Outta Town-set of Paper Smooches. I stamped the image with Memento Tuxedo Black and coloured it with Copics and a few touches of Derwent Coloursoft pencils.


Op de achterkant en binnenzijde testte ik mijn nieuwe Washi Tape van Rico Design. Ik had het product nog nooit eerder gebruikt en vrees dat ik er nu weer een verslaving bij heb.. Zo handig, snel en leuk!
De achterkant staat symbool voor het jachtige werkleven (de Washi Tape zegt 'Cancel, Approved, Urgent, OK') en de voorkant voor de ontspannen vakantiesfeer =)
Vanbinnen plakte ik datum-labels om zo een pocket agenda te creeren. Nu is het enkel nog aftellen tot Augustus =)!

On the back- and innerside I tested my new Washi Tape of Rico Design. I'd never used the product before but fell in love with it instantly! So easy, fast and fun!
On my finished notebook the backside is symbolising the hectic day to day-life ('Urgent, Approved, Cancel') as the front shows the state of utter relaxation only holidays can provide us with.
Inside I labelled the pages by day to create a pocket diary. My countdown untill the August holiday has started =)!

Ik heb nog 2 schriftjes voorradig dus ik hoop jullie snel weer een nieuw projectje te kunnen tonen!

I still have 2 notebooks waiting to be transformed. I hope to be able to share this with you soon!

Groetjes en een fijn weekend gewenst! / Greetings and have a nice weekend!

Eline

zondag 27 mei 2012

Copic Kleurenwaaier - Copic Color Swatch

Zo'n 160 Copics heb ik nu verzameld. Ik merkte echter dat ik bij het kleuren vaak naar dezelfde Copics terug grijp. Bij het kiezen van kleuren baseer ik me veelal op het Copic kleurschema. Alle kleuren netjes op nummer en per kleurfamilie: heel handige tool. Toch wou ik voor mezelf een hulpstuk creeren dat het mogelijk maakt elke kleur meer naar waarde te schatten en meer kleuren op gevoel te combineren dan met het hoofd (= opeenvolgende nummertjes).
Al van kinds af ben ik geobsedeerd door kleur. Balpennen, kleurpotloden, stiften, gelpennen,.. Ik heb ze in alle kleuren, merken en formaten. In doe-het-zelf-zaken vind je mij steevast in de verfhoek bij alle kleurkaartjes. Ik besloot om van mijn Copics een mooie kleurenwaaier te maken met volgend resultaat. Verder in de post beschrijf ik stap per stap mijn werkwijze.


I collected now over 160 Copics. I noticed however that I often use the same colors and many Copics stay neglected in the box. While choosing colors I use mostly the Copic color scheme. Each Color ordered by color family and number: very useful. But I decided a needed a tool to help me think outside of the box and select colors more by feeling instead of "mathematics". The small squares on the Copic color scheme also don't bring out the full beauty of each color. I decided to make a Copic Color Swatch book (inspired by these Pantone Color Swatches. As a child I could look at these for hours =/ ) Above you see the result and below step by step how I created it.

Groetjes! Greetings!

Eline


Benodigheden - Needed tools

Verdeel het papier in even vierkantjes - Divide paper in even Squares
Ik koos voor 5.5cm - I chose 5.5cm
Laat plaats tussen elk vierkant om het kleuren te vergemakkelijken
Leave space in between each square for easy coloring

Kleuren maar! - Let's color!
Ik gebruikte de beitelpunt, telkens 4 lagen.
I used the Chisel nib, 4 layers cross hatched

Schrijf met potlood de kleurcodes op de achterkant en snijdt de vierkantjes uit.
Write at the back of each Square the Color code and Cut.


Rond de hoekjes af met de Corner Chomper
Chomp the Corners


Perforeer en verstevig - Perforate each Square


Schrijf op elke achterkant de kleurcode. Ik schreef ook de kleurnamen omdat deze toch zo mooi zijn =)
Write on the back of each Square the color code. I also wrote the color name just because they're so beautiful =)


Hang de vierkantjes aan een ringbinder - Put the Squares on a metal ringbinder